Android Window 机制

Android Window 机制

在 Android 中 View 的绘制流程以及 Activity 和 View 的关系,都离不开 Window,本文将介绍 Window 的概念,以及在 Android 系统中的作用。在文末会放上几个与 WMS 有关的面试题,已巩固这部分知识点。
注:文中源码来源于 Android API 30

Window 存在的意义

Window 的概念在用户界面中是比较重要的,比如 Windows、MacOS 系统,View 都是显示在各个独立窗口中的,可以说 Window 是对 View 载体。在 Android 中,为了管理各 Window,Android 在系统进程中创建了一个系统服务 WindowManagerService,而 View 只能显示在对应的 Window 中。由于每一个 App 都是一个进程,所以 WMS 设计为系统进程,以方便统一管理。

Activity、Window 和 View 的关系

每个 App 都可以有很多窗口,为了方便管理页面的跳转回退逻辑,Android 系统为了单一职责封装了 Activity,并将 Activity 放入到栈中,并由 AMS 统一调度,又通过迪米特法则将 Window 屏蔽,并暴露了各个生命周期方法,让开发者专注于 View 的开发。

每个 Activity 包含了一个 Window(由 PhoneWindow 实现)。而 PhoneWindow 将 DecorView 作为了一个应用窗口的根 View,DecorView 又把屏幕划分为了两个区域:一个是 TitleView,也就是 ActionBar 或者 TitleBar,一个是 ContentView,通过 setContentView() 设置。

层级关系如下图所示:
Activity、Window 和 View 的关系

Activity

Activity 不处理加载视图的逻辑,在 attach() 的时候创建 Window 对象,在 onResume() 后通过 WindowManager 添加 View。

Window

每一个 Window 都管理着一个 View 树,View 必须依附在 Window 中才能展示。Activity 内部可以有多个窗口,例如在页面上弹出一个 Dialog,其中 Dialog 是一个单独的窗口。View 的测量、布局和绘制动作都是在一个 View 树种进行的,所以窗口之间 View 的改动是互不影响的。

WindowManager

WindowManager 是 Window 的管理类,但不直接管理 Window。WindowManager 与 Window 之间的关系是一个典型的桥接模式。而 WindowManager 使用 WindowManagerGlobal 通过 IWindowManager 接口与 WindowManagerService (也就是 WMS)进行交互,并由 WMS 完成具体的窗口管理工作。

public abstract class Window {
...
/**
* Set the window manager for use by this Window to, for example,
* display panels. This is <em>not</em> used for displaying the
* Window itself -- that must be done by the client.
*
* @param wm The window manager for adding new windows.
*/
public void setWindowManager(WindowManager wm, IBinder appToken, String appName,
boolean hardwareAccelerated) {
mAppToken = appToken;
mAppName = appName;
// 默认关闭硬件加速
mHardwareAccelerated = hardwareAccelerated
|| SystemProperties.getBoolean(PROPERTY_HARDWARE_UI, false);
// 如果传入的 WindowManager 为空,则通过 getSystemService 获取 WindowManager。
if (wm == null) {
wm = (WindowManager)mContext.getSystemService(Context.WINDOW_SERVICE);
}
// 将 WindowManager 和 Window 绑定,创建一个 WindowManagerImpl
mWindowManager = ((WindowManagerImpl)wm).createLocalWindowManager(this);
}
}

DecorView

DecorView 是 View 树的顶级 View,它是 FrameLayout 的子类。根据 Activity 设置的 Theme,DecorView 会有不同布局。但无论布局怎么变,DecorView 都有一个 Id 为 R.id.content 的 FrameLayout。Activity.setContentView() 方法就是在这个FrameLayout 中添加子 View 的。

ViewRootImpl

ViewRootImpl 是连接 WindowManager 和 DecorView 的纽带,View 的测量、布局和绘制均是通过 ViewRootImpl 来完成的。

Activity 是如何通过 Window 将 View 展示出来的

View 加载流程
这个需要从 Activity 的启动开始,Activity 的启动是通过 ActivityThread.handleLaunchActivity() 开始的:

public final class ActivityThread extends ClientTransactionHandler {
// 省略...

private void handleLaunchActivity(ActivityClientRecord r, Intent customIntent) {
//省略代码...
//performLaunchActivity
Activity a = performLaunchActivity(r, customIntent);
if (a != null) {
r.createdConfig = new Configuration(mConfiguration);
Bundle oldState = r.state;

//handleResumeActivity
handleResumeActivity(r.token, false, r.isForward,!r.activity.mFinished && !r.startsNotResumed);
//省略代码...
}
}

// 省略...
}
  • performLaunchActivity()
    完成 Activity 的创建,调用 Activity.attach() 方法,将 Window 创建出来,然后调用 Activity.onCreate() 方法。
  • handleResumeActivity()
    调用 Activity.onResume() 方法,处理 View 的展示。

1. performLaunchActivity()

以下为 performLaunchActivity() 方法的核心代码:

public final class ActivityThread extends ClientTransactionHandler {

// 省略...

private Activity performLaunchActivity(ActivityClientRecord r, Intent customIntent) {
ActivityInfo aInfo = r.activityInfo;
if (r.packageInfo == null) {
r.packageInfo = getPackageInfo(aInfo.applicationInfo, r.compatInfo,
Context.CONTEXT_INCLUDE_CODE);
}

ComponentName component = r.intent.getComponent();
if (component == null) {
component = r.intent.resolveActivity(
mInitialApplication.getPackageManager());
r.intent.setComponent(component);
}

if (r.activityInfo.targetActivity != null) {
component = new ComponentName(r.activityInfo.packageName,
r.activityInfo.targetActivity);
}

// 创建 Context
ContextImpl appContext = createBaseContextForActivity(r);
Activity activity = null;
try {
java.lang.ClassLoader cl = appContext.getClassLoader();
// 创建 Activity
activity = mInstrumentation.newActivity(
cl, component.getClassName(), r.intent);
StrictMode.incrementExpectedActivityCount(activity.getClass());
r.intent.setExtrasClassLoader(cl);
r.intent.prepareToEnterProcess();
if (r.state != null) {
r.state.setClassLoader(cl);
}
} catch (Exception e) {
if (!mInstrumentation.onException(activity, e)) {
throw new RuntimeException(
"Unable to instantiate activity " + component
+ ": " + e.toString(), e);
}
}

try {
Application app = r.packageInfo.makeApplication(false, mInstrumentation);

if (localLOGV) Slog.v(TAG, "Performing launch of " + r);
if (localLOGV) Slog.v(
TAG, r + ": app=" + app
+ ", appName=" + app.getPackageName()
+ ", pkg=" + r.packageInfo.getPackageName()
+ ", comp=" + r.intent.getComponent().toShortString()
+ ", dir=" + r.packageInfo.getAppDir());

if (activity != null) {
CharSequence title = r.activityInfo.loadLabel(appContext.getPackageManager());
Configuration config = new Configuration(mCompatConfiguration);
if (r.overrideConfig != null) {
config.updateFrom(r.overrideConfig);
}
if (DEBUG_CONFIGURATION) Slog.v(TAG, "Launching activity "
+ r.activityInfo.name + " with config " + config);
Window window = null;
if (r.mPendingRemoveWindow != null && r.mPreserveWindow) {
window = r.mPendingRemoveWindow;
r.mPendingRemoveWindow = null;
r.mPendingRemoveWindowManager = null;
}

// Activity resources must be initialized with the same loaders as the
// application context.
appContext.getResources().addLoaders(
app.getResources().getLoaders().toArray(new ResourcesLoader[0]));

appContext.setOuterContext(activity);
// **调用 Activity.attach() 方法**
activity.attach(appContext, this, getInstrumentation(), r.token,
r.ident, app, r.intent, r.activityInfo, title, r.parent,
r.embeddedID, r.lastNonConfigurationInstances, config,
r.referrer, r.voiceInteractor, window, r.configCallback,
r.assistToken);

if (customIntent != null) {
activity.mIntent = customIntent;
}
r.lastNonConfigurationInstances = null;
checkAndBlockForNetworkAccess();
activity.mStartedActivity = false;
int theme = r.activityInfo.getThemeResource();
if (theme != 0) {
activity.setTheme(theme);
}

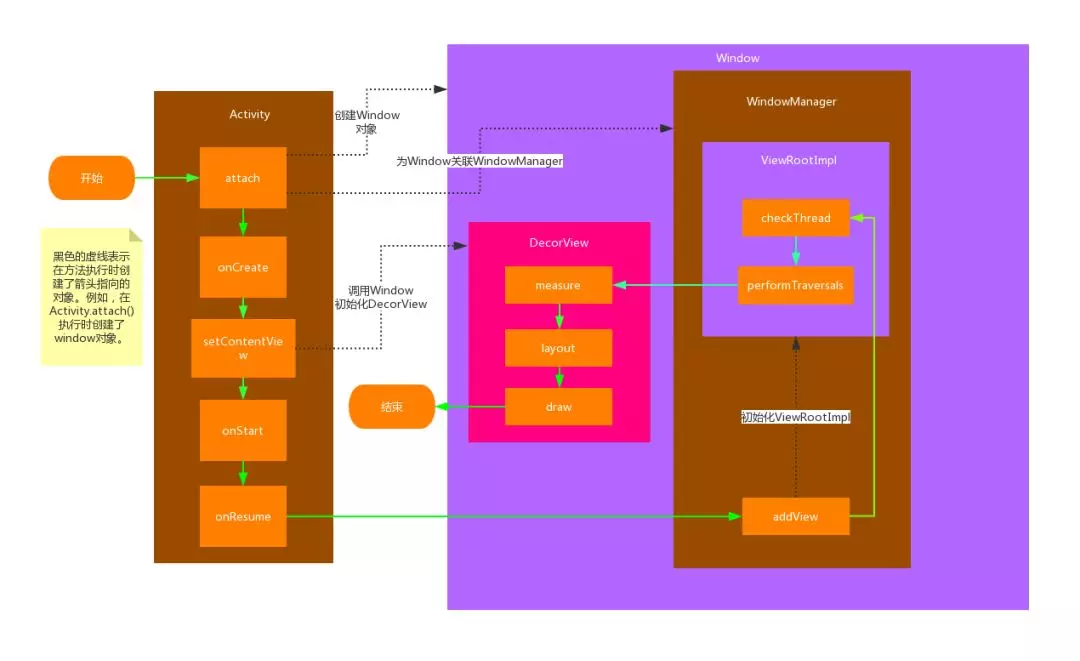
// 调用 Activity.onCreate() 方法
activity.mCalled = false;
if (r.isPersistable()) {
mInstrumentation.callActivityOnCreate(activity, r.state, r.persistentState);
} else {
mInstrumentation.callActivityOnCreate(activity, r.state);
}
if (!activity.mCalled) {
throw new SuperNotCalledException(
"Activity " + r.intent.getComponent().toShortString() +
" did not call through to super.onCreate()");
}
r.activity = activity;
mLastReportedWindowingMode.put(activity.getActivityToken(),
config.windowConfiguration.getWindowingMode());
}
r.setState(ON_CREATE);

// updatePendingActivityConfiguration() reads from mActivities to update
// ActivityClientRecord which runs in a different thread. Protect modifications to
// mActivities to avoid race.
synchronized (mResourcesManager) {
mActivities.put(r.token, r);
}

} catch (SuperNotCalledException e) {
throw e;

} catch (Exception e) {
if (!mInstrumentation.onException(activity, e)) {
throw new RuntimeException(
"Unable to start activity " + component
+ ": " + e.toString(), e);
}
}

return activity;
}

// 省略...
}

performLaunchActivity() 方法主要做了以下几个事情:

Activity.attach()

performLaunchActivity() 代码中,创建 Window 的逻辑是在 Activity.attach() 方法中的,我们跟进来看下:

public class Activity extends ContextThemeWrapper
implements LayoutInflater.Factory2,
Window.Callback, KeyEvent.Callback,
OnCreateContextMenuListener, ComponentCallbacks2,
Window.OnWindowDismissedCallback,
AutofillManager.AutofillClient, ContentCaptureManager.ContentCaptureClient {
// 省略...

final void attach(Context context, ActivityThread aThread,
Instrumentation instr, IBinder token, int ident,
Application application, Intent intent, ActivityInfo info,
CharSequence title, Activity parent, String id,
NonConfigurationInstances lastNonConfigurationInstances,
Configuration config, String referrer, IVoiceInteractor voiceInteractor,
Window window, ActivityConfigCallback activityConfigCallback, IBinder assistToken) {
attachBaseContext(context);

mFragments.attachHost(null /*parent*/);

// 创建 Window
mWindow = new PhoneWindow(this, window, activityConfigCallback);
mWindow.setWindowControllerCallback(mWindowControllerCallback);
mWindow.setCallback(this);
mWindow.setOnWindowDismissedCallback(this);
mWindow.getLayoutInflater().setPrivateFactory(this);
if (info.softInputMode != WindowManager.LayoutParams.SOFT_INPUT_STATE_UNSPECIFIED) {
mWindow.setSoftInputMode(info.softInputMode);
}
if (info.uiOptions != 0) {
mWindow.setUiOptions(info.uiOptions);
}

// 设置 UI 线程
mUiThread = Thread.currentThread();

mMainThread = aThread;
mInstrumentation = instr;
mToken = token;
mAssistToken = assistToken;
mIdent = ident;
mApplication = application;
mIntent = intent;
mReferrer = referrer;
mComponent = intent.getComponent();
mActivityInfo = info;
mTitle = title;
mParent = parent;
mEmbeddedID = id;
mLastNonConfigurationInstances = lastNonConfigurationInstances;
if (voiceInteractor != null) {
if (lastNonConfigurationInstances != null) {
mVoiceInteractor = lastNonConfigurationInstances.voiceInteractor;
} else {
mVoiceInteractor = new VoiceInteractor(voiceInteractor, this, this,
Looper.myLooper());
}
}

// Window 与 WindowManager 建立关联
mWindow.setWindowManager(
(WindowManager)context.getSystemService(Context.WINDOW_SERVICE),
mToken, mComponent.flattenToString(),
(info.flags & ActivityInfo.FLAG_HARDWARE_ACCELERATED) != 0);
if (mParent != null) {
mWindow.setContainer(mParent.getWindow());
}
mWindowManager = mWindow.getWindowManager();
mCurrentConfig = config;

mWindow.setColorMode(info.colorMode);
mWindow.setPreferMinimalPostProcessing(
(info.flags & ActivityInfo.FLAG_PREFER_MINIMAL_POST_PROCESSING) != 0);

setAutofillOptions(application.getAutofillOptions());
setContentCaptureOptions(application.getContentCaptureOptions());
}

// 省略...
}

Activity.attach() 方法主要做了以下几个事情:

  • 创建 Window 对象
  • 给 Window 设置 WindowManager
  • 设置 UI 线程

Activity.setContentView()

通常我们会在 Activity.onCreate() 方法中调用 setContentView() 方法,将 View 设置到当前页面中。Activity.setContentView() 又调用了 PhoneWindow.setContentView()

public class PhoneWindow extends Window implements MenuBuilder.Callback {
// 省略...

private DecorView mDecor;
// setContentView() 传过来的 View 会被加载到到 mContentParent 中。mContentParent 的 Id是 R.id.content
private ViewGroup mContentParent;

// 省略...

@Override
public void setContentView(View view, ViewGroup.LayoutParams params) {
if (mContentParent == null) {
installDecor();
}else if (!hasFeature(FEATURE_CONTENT_TRANSITIONS)) {
mContentParent.removeAllViews();
}
// 省略...
}

// 省略...

private void installDecor() {
if (mDecor == null) {
// 初始化 DecorView
mDecor = generateDecor();
mDecor.setDescendantFocusability(ViewGroup.FOCUS_AFTER_DESCENDANTS);
mDecor.setIsRootNamespace(true);
if (!mInvalidatePanelMenuPosted && mInvalidatePanelMenuFeatures != 0) {
mDecor.postOnAnimation(mInvalidatePanelMenuRunnable);
}
}
if (mContentParent == null) {
mContentParent = generateLayout(mDecor);
// 省略...
}
}

// 省略...
}

首次加载时,会执行 installDecor() 方法初始化 DecorView,调用 Activity.setContentView() 方法就会将 View 添加到 ID 为 R.id.content 的 FrameLayout 中。

2. handleResumeActivity()

以下为 handleResumeActivity() 的核心代码:

public final class ActivityThread extends ClientTransactionHandler {
// 省略...

@Override
public void handleResumeActivity(IBinder token, boolean finalStateRequest, boolean isForward,
String reason) {
// If we are getting ready to gc after going to the background, well
// we are back active so skip it.
unscheduleGcIdler();
mSomeActivitiesChanged = true;

// **调用 Activity.onResume() 方法**
// TODO Push resumeArgs into the activity for consideration
final ActivityClientRecord r = performResumeActivity(token, finalStateRequest, reason);
if (r == null) {
// We didn't actually resume the activity, so skipping any follow-up actions.
return;
}
if (mActivitiesToBeDestroyed.containsKey(token)) {
// Although the activity is resumed, it is going to be destroyed. So the following
// UI operations are unnecessary and also prevents exception because its token may
// be gone that window manager cannot recognize it. All necessary cleanup actions
// performed below will be done while handling destruction.
return;
}

final Activity a = r.activity;

if (localLOGV) {
Slog.v(TAG, "Resume " + r + " started activity: " + a.mStartedActivity
+ ", hideForNow: " + r.hideForNow + ", finished: " + a.mFinished);
}

final int forwardBit = isForward
? WindowManager.LayoutParams.SOFT_INPUT_IS_FORWARD_NAVIGATION : 0;

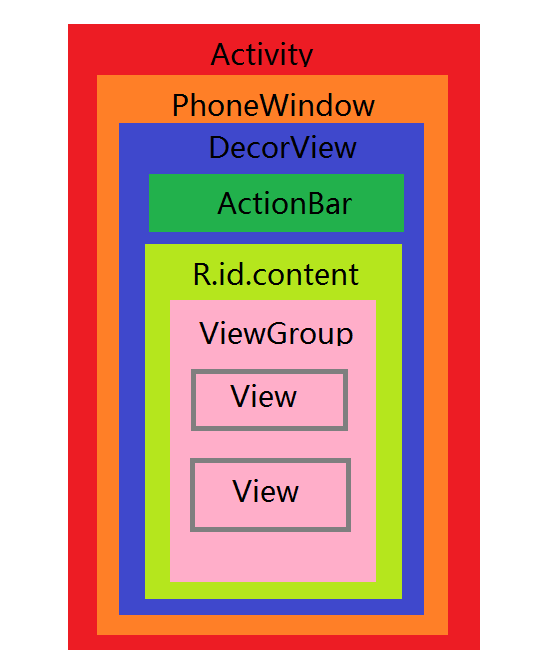
// If the window hasn't yet been added to the window manager,
// and this guy didn't finish itself or start another activity,
// then go ahead and add the window.
boolean willBeVisible = !a.mStartedActivity;
if (!willBeVisible) {
try {
willBeVisible = ActivityTaskManager.getService().willActivityBeVisible(
a.getActivityToken());
} catch (RemoteException e) {
throw e.rethrowFromSystemServer();
}
}
if (r.window == null && !a.mFinished && willBeVisible) {
r.window = r.activity.getWindow();
View decor = r.window.getDecorView();
// 将 DecorView 设置为不可见
decor.setVisibility(View.INVISIBLE);
ViewManager wm = a.getWindowManager();
WindowManager.LayoutParams l = r.window.getAttributes();
a.mDecor = decor;
l.type = WindowManager.LayoutParams.TYPE_BASE_APPLICATION;
l.softInputMode |= forwardBit;
if (r.mPreserveWindow) {
a.mWindowAdded = true;
r.mPreserveWindow = false;
// Normally the ViewRoot sets up callbacks with the Activity
// in addView->ViewRootImpl#setView. If we are instead reusing
// the decor view we have to notify the view root that the
// callbacks may have changed.
ViewRootImpl impl = decor.getViewRootImpl();
if (impl != null) {
impl.notifyChildRebuilt();
}
}
// **通过 WindowManager 加载 DecorView**
if (a.mVisibleFromClient) {
if (!a.mWindowAdded) {
a.mWindowAdded = true;
wm.addView(decor, l);
} else {
// The activity will get a callback for this {@link LayoutParams} change
// earlier. However, at that time the decor will not be set (this is set
// in this method), so no action will be taken. This call ensures the
// callback occurs with the decor set.
a.onWindowAttributesChanged(l);
}
}

// If the window has already been added, but during resume
// we started another activity, then don't yet make the
// window visible.
} else if (!willBeVisible) {
if (localLOGV) Slog.v(TAG, "Launch " + r + " mStartedActivity set");
r.hideForNow = true;
}

// Get rid of anything left hanging around.
cleanUpPendingRemoveWindows(r, false /* force */);

// The window is now visible if it has been added, we are not
// simply finishing, and we are not starting another activity.
if (!r.activity.mFinished && willBeVisible && r.activity.mDecor != null && !r.hideForNow) {
if (r.newConfig != null) {
performConfigurationChangedForActivity(r, r.newConfig);
if (DEBUG_CONFIGURATION) {
Slog.v(TAG, "Resuming activity " + r.activityInfo.name + " with newConfig "
+ r.activity.mCurrentConfig);
}
r.newConfig = null;
}
if (localLOGV) Slog.v(TAG, "Resuming " + r + " with isForward=" + isForward);
ViewRootImpl impl = r.window.getDecorView().getViewRootImpl();
WindowManager.LayoutParams l = impl != null
? impl.mWindowAttributes : r.window.getAttributes();
if ((l.softInputMode
& WindowManager.LayoutParams.SOFT_INPUT_IS_FORWARD_NAVIGATION)
!= forwardBit) {
l.softInputMode = (l.softInputMode
& (~WindowManager.LayoutParams.SOFT_INPUT_IS_FORWARD_NAVIGATION))
| forwardBit;
if (r.activity.mVisibleFromClient) {
ViewManager wm = a.getWindowManager();
View decor = r.window.getDecorView();
wm.updateViewLayout(decor, l);
}
}

r.activity.mVisibleFromServer = true;
mNumVisibleActivities++;
// 将 DecorView 设置为可见状态
if (r.activity.mVisibleFromClient) {
r.activity.makeVisible();
}
}

r.nextIdle = mNewActivities;
mNewActivities = r;
if (localLOGV) Slog.v(TAG, "Scheduling idle handler for " + r);
Looper.myQueue().addIdleHandler(new Idler());
}

// 省略...
}

handleResumeActivity() 方法为本文的重点,主要做了以下几个事情:

  1. 首先调用了 Activity.onResume() 生命周期
  2. 将 DecorView 设置为不可见
  3. 通过 WindowManager 加载 DecorView
  4. 将 DecorView 设置为可见

WindowManager 加载 DecorView

因为 WindowManagerImpl 为 WindowManger 的实现,所以下面来看一下 WindowMangerImpl.addView() 方法。

public final class WindowManagerImpl implements WindowManager {

private final WindowManagerGlobal mGlobal = WindowManagerGlobal.getInstance();
// 省略...
private IBinder mDefaultToken;

/**
* Sets the window token to assign when none is specified by the client or
* available from the parent window.
*
* @param token The default token to assign.
*/
public void setDefaultToken(IBinder token) {
mDefaultToken = token;
}

@Override
public void addView(@NonNull View view, @NonNull ViewGroup.LayoutParams params) {
applyDefaultToken(params);
mGlobal.addView(view, params, mContext.getDisplayNoVerify(), mParentWindow,
mContext.getUserId());
}

// 省略...

private void applyDefaultToken(@NonNull ViewGroup.LayoutParams params) {
// Only use the default token if we don't have a parent window.
if (mDefaultToken != null && mParentWindow == null) {
if (!(params instanceof WindowManager.LayoutParams)) {
throw new IllegalArgumentException("Params must be WindowManager.LayoutParams");
}

// Only use the default token if we don't already have a token.
final WindowManager.LayoutParams wparams = (WindowManager.LayoutParams) params;
if (wparams.token == null) {
wparams.token = mDefaultToken;
}
}
}

// 省略...
}

其中 addView() 方法逻辑很简短,直接调用 WindowManagerGlobal.addView() 方法。在调用之前,还会执 applyDefaultToken() 方法,这个的作用是给 DecorView 加一个身份标识,表示当前的 DecorView 属于那个 Activity,然后将当前的 DecorView 绘制到 Activity 中。

WindowManagerGlobal 加载 View

紧接着进入 WindowManagerGlobal.addView() 方法,以下为核心代码:

public final class WindowManagerGlobal {
private final ArrayList<View> mViews = new ArrayList<View>();
private final ArrayList<ViewRootImpl> mRoots = new ArrayList<ViewRootImpl>();
private final ArrayList<WindowManager.LayoutParams> mParams =
new ArrayList<WindowManager.LayoutParams>();
// 省略...

public void addView(View view, ViewGroup.LayoutParams params,
Display display, Window parentWindow, int userId) {
// 省略一些校验...

final WindowManager.LayoutParams wparams = (WindowManager.LayoutParams) params;

// 省略...

ViewRootImpl root;
View panelParentView = null;

synchronized (mLock) {
// 省略...

root = new ViewRootImpl(view.getContext(), display);

view.setLayoutParams(wparams);

mViews.add(view);
mRoots.add(root);
mParams.add(wparams);

// do this last because it fires off messages to start doing things
try {
root.setView(view, wparams, panelParentView, userId);
} catch (RuntimeException e) {
// BadTokenException or InvalidDisplayException, clean up.
if (index >= 0) {
removeViewLocked(index, true);
}
throw e;
}
}
}
// 省略...
}

在 WindowManagerGlobal 中,首先会创建 ViewRootImpl,将 View、ViewRootImpl 和 LayoutParams 放入到 List 中,后边更新 UI 使用,三者因下标相同,所以可以一一对应。然后调用 ViewRootImpl.setView() 加载 View。

ViewRootImpl.setView()

ViewRootImpl.setView() 方法比较长,提取了一下其中的关键逻辑:

public final class ViewRootImpl implements ViewParent, View.AttachInfo.Callbacks, ThreadedRendererDrawCallbacks {
// 省略...
View mView;
// 省略...

public void setView(View view, WindowManager.LayoutParams attrs, View panelParentView, int userId) {
synchronized (this) {
if (mView == null) {
mView = view;

// 省略...

requestLayout();

// 省略...

// 通过 IPC 通信通知 WMS 渲染界面
res = mWindowSession.addToDisplayAsUser(mWindow, mSeq, mWindowAttributes,
getHostVisibility(), mDisplay.getDisplayId(), userId, mTmpFrame,
mAttachInfo.mContentInsets, mAttachInfo.mStableInsets,
mAttachInfo.mDisplayCutout, inputChannel,
mTempInsets, mTempControls);

// 省略...
}
}
}

// 省略...

@Override
public void requestLayout() {
if (!mHandlingLayoutInLayoutRequest) {
checkThread();
mLayoutRequested = true;
scheduleTraversals();
}
}

// 省略...

void checkThread() {
if (mThread != Thread.currentThread()) {
throw new CalledFromWrongThreadException(
"Only the original thread that created a view hierarchy can touch its views.");
}
}

// 省略...
}

setView() 方法中,首先调用了 requestLayout(),然后通过 IPC 通信,通知 WMS 渲染界面。跟进 requestLayout() 方法中,首先需要检查当前线程,然后调用 scheduleTraversals()

public final class ViewRootImpl implements ViewParent, View.AttachInfo.Callbacks, ThreadedRendererDrawCallbacks {
// 省略...

final class TraversalRunnable implements Runnable {
@Override
public void run() {
doTraversal();
}
}
final TraversalRunnable mTraversalRunnable = new TraversalRunnable();

// 省略...

void scheduleTraversals() {
if (!mTraversalScheduled) {
mTraversalScheduled = true;
mTraversalBarrier = mHandler.getLooper().getQueue().postSyncBarrier();
mChoreographer.postCallback(
Choreographer.CALLBACK_TRAVERSAL, mTraversalRunnable, null);
notifyRendererOfFramePending();
pokeDrawLockIfNeeded();
}
}

// 省略...

void doTraversal() {
if (mTraversalScheduled) {
mTraversalScheduled = false;
mHandler.getLooper().getQueue().removeSyncBarrier(mTraversalBarrier);

if (mProfile) {
Debug.startMethodTracing("ViewAncestor");
}

performTraversals();

if (mProfile) {
Debug.stopMethodTracing();
mProfile = false;
}
}
}

// 省略...
}

其调用链为 setView() -> requestLayout() -> scheduleTraversals() -> doTraversal() -> performTraversals()

View 的绘制流程

接下来就是 View 树的绘制流程,我们进到 performTraversals() 方法中看一下关键代码:

public final class ViewRootImpl implements ViewParent, View.AttachInfo.Callbacks, ThreadedRendererDrawCallbacks {
// 省略...

private void performTraversals() {
// 省略...
performMeasure(childWidthMeasureSpec, childHeightMeasureSpec);
// 省略...
performLayout(lp, mWidth, mHeight);
// 省略...
performDraw();
// 省略...
}

// 省略...
}

View 的绘制分三步,测量、布局和绘制,详细内容将在另一边文章展开。(TODO)

相关面试题

为什么要要设计 Window?

  1. 使 Activity 的职责更加单一。
  2. View 树的控制封装到 Window 之后,Activity 只需要管理 Window 即可。

子线程是否可以更新 UI?

从 ActivityThread 的源码得知,View 的绘制是发生在 Activity onResume 生命周期之后的,所以在 onCreate() 方法、第一次进入 onResume() 方法时,都是可以在其他线程更新 UI 的。
关于子线程更新 UI 的更多问题,可以转到这篇文章看下。

可以在 Activity.onCreate() 中获取到 View 的宽和高吗,在 Activity.onResume() 中呢?

  1. 如果直接获取或者用 Handler 获取,是无法获取到 View 的宽高的,因为 View 的绘制流程是在 onResume() 方法之后的,但是如果采用延时 Handler 是可能会获取到宽高的。使用 View.post() 方法可以获取到宽高。
  2. 如果直接获取或者用 Handler 获取,在第一次进入到 onResume() 方法时,跟在 onCreate() 的情况是一样的,当再次进入到 onResume() 方法,是可以获取到的。同样,使用 View.post() 方法可以获取到宽高。

为什么使用 View.post() 方法可以获取到宽高?

首先我们先看下 View.post() 的逻辑:

public class View implements Drawable.Callback, KeyEvent.Callback, AccessibilityEventSource {
// 省略...

public boolean post(Runnable action) {
final AttachInfo attachInfo = mAttachInfo;
if (attachInfo != null) {
return attachInfo.mHandler.post(action);
}

// Postpone the runnable until we know on which thread it needs to run.
// Assume that the runnable will be successfully placed after attach.
getRunQueue().post(action);
return true;
}

// 省略...
}

onCreate() 中 attachInfo 为空,则先将 runnable 放入到队列中,然后这个队列中的任务会在 performTraversals() 中执行。

public final class ViewRootImpl implements ViewParent, View.AttachInfo.Callbacks, ThreadedRendererDrawCallbacks {
// 省略...

private void performTraversals() {
// 省略...
// Execute enqueued actions on every traversal in case a detached view enqueued an action
getRunQueue().executeActions(mAttachInfo.mHandler);
// 省略...
performMeasure(childWidthMeasureSpec, childHeightMeasureSpec);
// 省略...
performLayout(lp, mWidth, mHeight);
// 省略...
performDraw();
// 省略...
}

// 省略...
}

通过 View.post() 添加的任务,是在 View 绘制流程的开始阶段,将所有任务重新发送到消息队列的尾部,此时相关任务的执行已经在 View 绘制任务之后,即 View 绘制流程已经结束,此时便可以正确获取到 View 的宽高了。

评论